

By definition a focal/accent/feature wall is that one with a different design than all other walls in a room.Everyone who has operated a camera knows that finding the right focal point and having a steady focus is one of the most important of keys for having a good photograph. Well that is very true when it comes to pulling a room together too. Having a focal wall/Feature wall/ Accent wall takes a room from being "so-so " to "oh ,Wow".
What is a focal wall? As name suggests it is the wall that takes the focus, the center stage in a room. While there are any number of ways to design one, most common route taken is to paint the wall in a different color, one that compliments or create a contrast. This is the easiest way too. But what if you want something different than this expected design?
Then you have a number of options too.
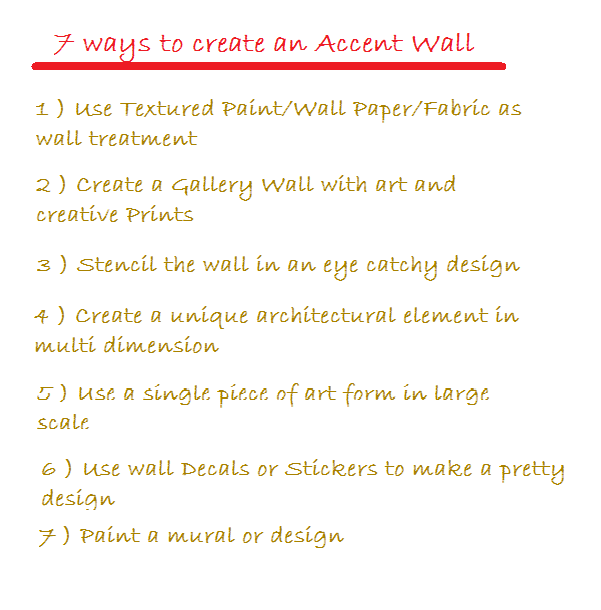
When it came to designing an accent wall for my daughter's room, I went with the easy and less permanent option of wall decals, ( For one, this is a rental, and second we could get tired of the design ) that is number 6, from above list.
Finding decals and stickers is not really easy , especially so if your budget is on the lower side and you don't want characters or themes. Akshara is in love with polka dots and I wanted a pattern that is classic enough to survive trends and since this is also an easy pattern to create on a large scale I decided I will have dots on the wall.

I considered a number of designs with polka dots to put on the walls. But then thought, may be these are all expected designs and there is no added fun or whimsy in these. I thought about it for a while and when she started talking about sun and planets ( Courtesy Dr.Seuss ) I knew I could easily create a sun on the wall. That is how this wall came into existence.
So here are the materials needed.
1) A roll of copper/gold contact paper. I used these. Copper is trendy these days so price looks to be increased)
2) Scissors
3) Yarn and tape to mark and measure lines
4) Tape to measure.
Creating it was easy and took only an evening ( One Saturday evening and 2 pair of hands, of course a little girl for assistance). We measured the center of the wall and kept a mirror in hand to mark the center. Then created straight lines with yarn and sticky tape. First 4 quarters, then again the middle of each quarter , until it looked sufficiently filled.
 |
| Forgive for the poor quality pic - old ones captured on a phone camera, I didn't really pay attention then |
Then we cut out circles from the contact paper and applied them to the walls. Easy and simple.
Once we had the walls completed, I had the mirror frame spray painted with copper metallic paint and created a sun burst mirror created out of it.

It took about 4 hours to complete the wall, I think could have finished it earlier if we had used pre-cut peel and stick dots that are available in stores like Urban Outfitters. I didn't opt for them because they would cost me much more than I originally planned. Anyways, here are some closer shots.


See how a can of paint and some self adhesive paper make all the difference in the world? I like that simple and easy solutions can make any place a happy space. What do you think? Do you like the idea of focal walls and easy fixes?
Keep Smiling,
Anima

WordPress inLinkz code:


I stumbled upon your blog from Whatsurhomestory. The accent wall with the sunburst mirror looks very pretty! Sounds pretty simple too.
ReplyDeleteThank you for visiting Prash. Yes, indeed they are simple, especially if you have a circle punch - charmingly easy.
DeleteWow, this is amazing! What a cool twist on the sunburst--love how you transformed a whole wall with a simple technique :)
ReplyDeleteAmy | Club Narwhal
Thanks Amy. So happy that you loved it as much as we enjoy it.
DeleteI love this! So smart to combine the mirror with the dots in that way. And a great tutorial too. Thank you for linking up with us at The Makers! :)
ReplyDeleteThank you Alexis, so happy and overwhelmed that you stopped by.
Delete