Featured Slider

Showing posts with label Decor. Show all posts

DIY : A BOHO CHIC WOOD VASE

Honestly speaking I am not in any need of a new vase. But then you take a casual stroll around your favorite craft store and you spot a raw wood vase in a classic shape. Would you be able to resist? Especially when it costs on $6 and you have 50% off coupon some where in your wallet? Neither could I. So I got the vase ( Insert a smiley here, would you please?)

But this DIY is much more interesting than my shopping story. When you read the rest of this post and find out what I did with my plain jane wood vase,- it would blow your mind with its simplicity. Really - Nothing more simple than this one.

DIY Boho chic wood vase with easy instructions

These days I am trying to keep my decor and accessories to a minimum.A lot of it has to do with my new found tidying obsession . When you keep quantity of things to a minimum, what can add interest is the patterns and geometry on the surfaces. That is what I aimed for anyway. So I chose a design that has beautiful pattern on it.

DIY Boho chic wood vase with easy instructions


The first thing that came up to my mind when I started imagining the ways to get creative with it was the jewelry holder project Jen recently did on I heart Organizing. The marbled gift wrap has stayed in my mind ever since. But it was from Minted but I could not justify the dollars. So I got on my ideas wagon and a rummage through my washi tape collection solved my problem. Doesn't this traditional pattern bring you this perfect boho chic vibe?

So here is the How to of my boho chic wood vase.

DIY Boho chic wood vase with easy instructions

What You Need

A plain vase in interesting shape
Washi Tape of your choice
Scissors


Step 1: (Insert a smile here, please) . Measure and apply the washi tape and cut at edges. To ensure a smoother coverage, try to overlap the tape over the edges to the adjacent side. If your tape has a recurring design as in mine - you have to take extra care to get the continuity of the pattern.

Step 2: Continue until you cover the entire vase.

DIY Boho chic wood vase with easy instructions

Tip : Mine is a wooden vase - for fresh flowers you will have to use a small glass tube to fill with water.

DIY Boho chic wood vase with easy instructions

Do you love these simple decorating projects ? What crafts are you guys whipping out these days?
Share your ideas and comments below.

DIY : TERRARIUM THAT YOU CAN'T KILL


Every year when summer approaches,plants and home gardens become high priority.Since the last few years, it is terrariums that are all the rage.It isn’t surprising when one considers the beauty and character of most terrarium plants, such as succulents and cacti. But as pretty as they look, these individual plants also tend to be expensive and are delicate in nature. So I figured, why not give the traditional terrarium a cost-effective twist? One that is friendly enough for busy peeps and even those that consider themselves as having a black thumb.

DIY : MARBLED RECIPE BOX

Marbled Recipe Box

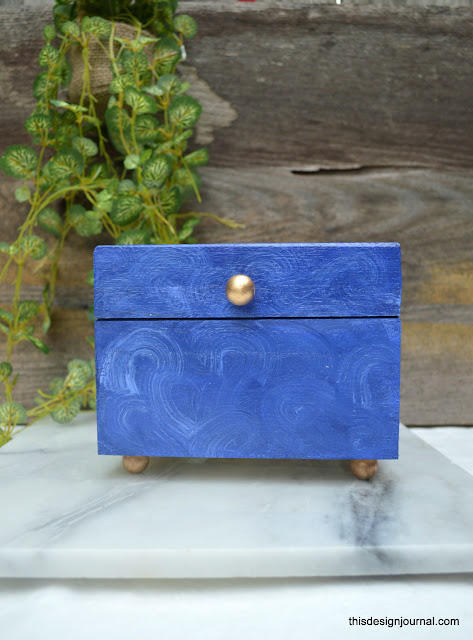
In today's edition, I have an easy, customised recipe box that I made for a dear friend. In today's digital world I am not sure how many of us really use good old hand written recipes, but if you are an inspired cook or have an inspiring cook as my friend, then this is for you or them. If there is anything as charming as those hand-me-down, frailed pieces of paper with your favorite recipes on them, it is the food you made with the recipe itself .So here is how I tweaked a regular raw box into a marbled pretty one.

SHABBY CHIC NURSERY INSPIRATION


Shabby Chic - When I hear the word what comes to mind is pastel pinks and distressed, antique, aged furniture pieces and calm, feminine vibe. I believe it is indeed very close to what it means to be because the official definition by google and wiki give is this, here I quote - 

SIMPLEST OF ALL WREATHS


Hey All, I have a confession to make. That is, I am not crazy. I don't make wreaths every day. On the contrary I made my first wreath very recently which is still hanging on our door. But it turns out that I love the look of wreaths and certainly love making them. So you may get to see some every now and then here as well.

This particular one is something I made for the May issue of Malayali Magazine, which is a bilingual print published exclusively from US Of A. There are some great stories, commentary on current affairs and food for thought too along with fashion, food and crafts.


Well, on to our wreath, I have a step by step guide published on Guide Central so I will spare the step by step details and just show you how easy home decor can be if you are really into it with some behind the scenes.

Supplies


--Ring
--Green leaves
--Faux flowers
--Floral wire.


I basically started out with tying the leaves to the ring with floral wire.


Next, I removed the flowers from the stem and glued them to the ring.


That's all. Hang up and enjoy.


Do you like what you see? If yes,  Please subscribe ( on the side bar, it is free) and get regular updates or follow us on FACEBOOK or PINTEREST


DIY : PARTY BUNTING WITH PAINTCHIPS


Hey All,

There are times when I make things just because I feel like it. Today's is one such occasion. I really didn't need a banner though I could use some color on blank walls around the home. But honestly there wasn't any need of a banner or bunting at this point. But I had all these paint chips ( small papers with paint colors made by paint manufacturers) that I have been hoarding and I thought well let me make one and share. How nice of me right!!


Well those stories apart, these are the easiest and probably cheapest party perfect banner/bunting you would have seen. Mostly because they are made of paint chips that are free at home improvement stores and only other things you would need are scissors and glue - for the simplest of them. Here I am showing one version and you can find hundred other ways to customise it like, painting, marbling, stencilling, glittering - anything really.


supplies :

Paint chips in colors of choice
Glue
Scissors
Ribbon/twain
Washi tape for decoration


The steps are fairly simple. The paint chips I chose were rectangular in shape . They are basically thick craft paper either glossy or matte finish . I wanted to make triangle bunting. I folded each one in half and cut out triangle shape by cutting the sides at an angle. Then I put the twain in the middle of it and glued both sides together. Repeat for as many as you need. Once I had the banner I decorated it with washi tape that I had in hand .


This can be done with regular craft paper, only they won't be really free.


That's it. Easy and cheap banner for the next summer get-together.


If you haven't tried decorating with these paint chips yet, I think you must. The possibilities are endless. I have a large scale wall art in mind next . Are you gonna try too? Do let me know your thoughts.

Do you like what you see? If yes,  Please subscribe ( on the side bar, it is free) and get regular updates or follow us on FACEBOOK or PINTEREST

Anima


A WORKSPACE TOUR


If you are a reader here for a while, you already know this. I am a stay at home and a homemaker for past few years. I am also an avid crafter/maker and I love decorating my home and blogging about it. As much as I adore blogging I don't consider it as a job or business. It is a passion.

But to be honest this passion is also work. Those who blog know that I am understating it when I say it is a lot of work. And it is also a passion that is fuelled by validation too. Yes, I mean it when I say it. It is incredibly encouraging to have your work noted, being able to talk about it. I think it is with like any other job, though with regular job it is so subtle and common to be part of a team that no one stops for these thoughts.


I must say I like the comfort of calm and peace while I write or make. A place where I could shut down all the noise around me, which is also a dream but for a few hours since I have a little girl. But I didn't take that thought seriously until I came across WeWork, a co-working company with an incredible thought and mission. They strive to create co-working spaces and an inspiring community for freelancers who can rent an office space with all necessary services (food and coffee included) on a monthly subscription basis. You can meet like minded peers and interact and feel the force of community if you choose to do so. A creative space to work and the feel of community, both something all freelancers and makers like me crave for. Interesting isn't it?

So on to the work space "the inspired me" created -


To be honest, it is a basic space though it has all the minimum necessities to function as a creative space. A desk, a comfortable chair, storage, colors for inspiration, knick knacks for decor and simple tools for an organised space.


I have tried to pretty up the shelves and pair down my belongings so that the place and shelves don't look or feel cluttered. It also gives space to grow as and when I need more storage.


There are a number of things I want to add to the space -  more artwork, a DIY Calendar etc. Stay tuned for them.


So how do you feel? Would you be thrilled to join a community that believe in empowering their team to create their own life's work and look after each other and care about the work and welfare of the team?

This post is inspired by WeWork, a co-working company. Please check out the details HERE. Interestingly among the offices they have in almost all the major cities in US and around the world , we have three centres in Washington DC,  here they are. That point is especially interesting for me - a DC girl.


Anima

QUICK FIX DECOR : GLASS BOWL PLANTER


Today I want to share something that is exactly what the title says. A quick fix decorating trick.

This is not a new project and I am definitely not the first one to do it. I don't remember where I saw this first time , but I noted it when I saw it at Little Green Notebook. This is a favourite one because this painted bowl has been with me for almost 2 years now but it looks the same then and now. Sometimes simple things that we make with cheapest stuff stays with us the longest.


I use this bowl as a planter for my succulents or faux ones when I kill them. But it could be anything really. It could do anything any bowl does and if you are patient enough it could look much prettier too, well except for any "food" related things.


I bought the bowl from Goodwill for a few cents I believe. Then I painted it with regular craft paint. To be specific, I poured out some paint into the bowl and spread it well and evenly with a brush. Once the paint was dry I gave it a coat of Mod Podge as a sealer. That was it.


For added color I put some decorative stones inside though.


I have directly planted my succulents which do not need a lot of water. If your plant takes a lot of water, it would be ideal to keep it in a planter and put it inside the bowl just to make sure that the paint doesn't bleed. I haven't had an issue till now though. Well other than killing my plants once or twice or thrice - But that is generally me. I have special knack of doing that. But trust me this one has been with me for a few weeks now and we are doing fine.

Do you like what you see here? Please don't forget to "LIKE" us on FACEBOOK  or Subscribe to Mailing List ( On the side bar) to follow along.

Anima.


After the Break - A Wreath of Flowers


It has been a while since I have been away from this space. It was supposed to be a short vacation which took an unexpected turn and prolonged. What was I doing all this while? Hm.. That is a long story which needs justice. Anyways, today I have a simple DIY wreath that we made here.

This is the first time I am making a wreath to hang on our front door. I usually skip big time seasonal decorating, mostly because these things have to be changed every 3 months - I mean you are forced to change because otherwise you are a homemaker just too lazy in your own eyes and of your neighbors. But it is spring break here in Virginia and since the weather is not so good outside I am entertaining a over enthusiastic child with a variety of crafts and paints which she thinks she is helping. If you are a mother and crafter, you know what I mean.

So here is a simple wreath we made for Spring with stuff that I found in my craft closet. You will find a few old dollar store artificial flowers thrown in the mix which I didn't plan to add but I had to because the little one forced my hand.

So here are the supplies.


Supplies :
  • Grapevine Wreath ( This was from Target Dollar Spot a while ago)
  • Ribbons ( Collected over time, but I am sure they are from Michaels )
  • Decorative Nest ( From Michaels, most craft stores will carry them in season I believe )
  • Decorative Eggs
  • Decorative Bird (Old X.Mas ornament)
  • Decoratice Flowers ( have used more than pictured here as I went)
  • Jute Twine 
Here is how it turned out.


The steps are fairly simple. I started by tying the green decorative stem to the wreath with jute twine.


I decided to do it only one side not to overwhelm the whole thing. But that is just a choice. Once this part was done I hot glued the nest and the bird to the bottom part of the wreath. My little girl was part of this process and she insisted on adding the pink grass ( I know it isn't logical, but this 4 year is still at the "everything pink" stage)

The eggs I originally planned to add turned out to be too big, so I collected two egg shaped pieces from an old potpourri and painted them green and pink (again - no logic). Once this was done, still the wreath felt a little bland and lacked the playful touch so I used some old dollar store artificial flowers ( Yes, I am totally that girl who is entertained by dollar store bouquets ) to add. If you find it out of place by any means, that is because this was done on a whim and totally unplanned.


That's it for the day friends, What are your decor plans for this spring? Got any craft ideas to do with kids this vacation? Suggest me some.

Linking this up to Link Party Palooza by tatertots & jello.
Anima

The humble Master of the house

I have this weird hobby of going through floor plans, from magazines, builder's websites . Thousands that I have gone through, I have noted one thing common everywhere. There is one bedroom that is larger than others - called master bedrooms.


As far as Indian  ( my home country) architecture goes, I believe this is a modern concept borrowed from outside. Not that I have any regret in the borrowing part, actually I am happy for it.  My grand parent's home in the rural part of Kerala ( Southern corner of India ), where I had spent the majority of my childhood vacations, had 6 bedrooms all the very same size. And they were represented by the direction the rooms were in. ( As in the bedroom on the south wall is called "thekkini" for south is "thekku" in malayalam, my mother tongue.)

Plan of our Home in India via

Anyways, back to our modern era, when we moved to this current home, my first instinct was to use the bigger,larger bedroom with two individual closets as the master bedroom. The Realtor also addressed this as master bedroom with great enthusiasm. Rightly so, because it was indeed a big bedroom. Without a second thought we chose it to be our master. That made sense too, because our then 2 year old little girl was still co-sleeping. We lived like that for about 5 months.

Things started getting uncomfortable when she grew bigger and started claiming more space.The girl, twists and turns and - wait for it, talks in sleep, sometimes for quite a length.Then there were more things like toys, cloths, everything started ending up in this room.


That is when the switch happened.  We opted for the smaller room as our bedroom, and converted the master into the kid's space. One of the best decisions we made as far as this house goes.

The room is 11'0''-10'9' and that includes a closet space and a non usable corner.But as humble as it is, it still lives large as the master of the house. It functions well, used to hold an office desk too when my husband was taking official calls from home until sometime ago.

I did not plan it out elaborately as I had done for my living room. This room grew more organically, adapting according to the needs of the moment.


We had only limited expectations from the start.Like,

1 ) Accommodate a queen size bed. We had our bed and mattress for 5 years now. Since a good set is really costly, I have no plans to upgrade it no matter what the size of the room is.

2 ) A reading space, at the minimum a comfortable chair to read or take official calls. We don't have any other space in the house where you can attend a phone call away from the riot our little one makes. That excludes the bathroom of course!

3 ) A place for cloths and nitty gritty. The closet space was a good start since we are on the minimal side as far as clothes go.

4 ) A place for displaying some family pictures.

The needs were minimal, and easy to accommodate and I had all that was needed in hand.


As I said earlier, we had this bed from a long time ago. To give it a finished look I just added a head board, which is actually foam board covered with vinyl self adhesive paper. It may sound lame for a headboard, but 2 years now, it hasn't budged. I feel like changing it though. My taste has evolved since then, and it is really not a big task to replace it with something better. How about a tufted head board? I could try.

Bedding is from Target, I have only two bed sheets that I rotate every week. Bedspread also from Target, a Nate Berkus creation I grabbed from the clearance section. He is an awesome designer - so awesome that staying away from him is better for your pocket.


I had the rocker I got from overstock.com . While it is not very comfortable for long reading sessions, it works just fine. As such my daughter wouldn't let me sit more than an hour on my own. The discomfort comes from the fact that it doesn't have a head rest. So a more comfortable recliner would be way to go for relaxed sitting, if you have space. Especially so if you have a TV in the room.


I added these planks from Ikea for a small display area. If space permitted I would have gone for a free standing shelf but, to have the floor free, opted for wall shelves. These are cheaper too. At $2 each for the shelves, 50¢ the brackets and $5 on the wood stain, the whole project came under 15 I believe.My figures might be off as all this happened more than an year ago.


We have a dresser added to the corner for the clothes and extra blankets and towels etc. I brought it home from Goodwill, it was a good mid century model that needed a little love from Howards Restor-A-Finish. It is magical as far as refinishing a beaten up wooden piece goes.

Here are some detail shots for your eyes...


Since this post is already this long, I think it is better to do a follow up post about the details and "how" parts. Almost every other thing, as art, end table, the dresser, rocker, the closet/wardrobe all have back stories worth a tell.

That concludes the master tour for the time being. Since I am a tweak-er, I am sure I will keep changing and experimenting.So don't be surprised if I come with an update after a few months. I simply can not "not change" anything.

Thanks a ton for visiting and do leave your comments below. Happy tweaking...