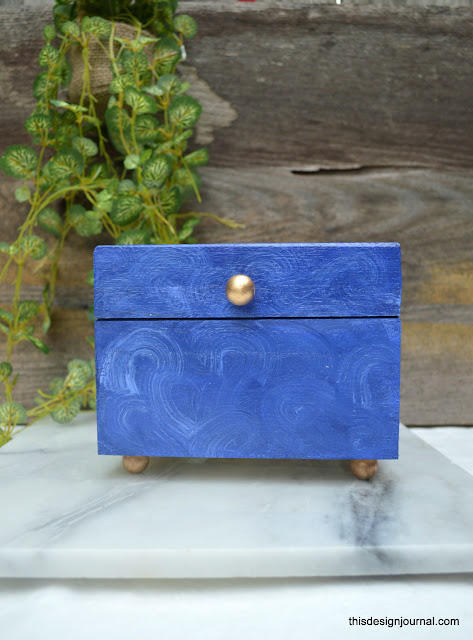
In today's edition, I have an easy, customised recipe box that I made for a dear friend. In today's digital world I am not sure how many of us really use good old hand written recipes, but if you are an inspired cook or have an inspiring cook as my friend, then this is for you or them. If there is anything as charming as those hand-me-down, frailed pieces of paper with your favorite recipes on them, it is the food you made with the recipe itself .So here is how I tweaked a regular raw box into a marbled pretty one.
Supplies
--A plain Box from Crafts store. Mine is from here .
--Wood Beads. Found here
--Mod Podge
--Wood Glue ( Mine came as part of a gift set from Guidecentral) . You can find similar here.
--Liquid Gold Leaf
--Craft Paint.
--Brush.
You can customise this plain box in a million ways. I chose to try the marbled ( more of malachite effect . If you missed the post about I made a Malachite Candle Bowl, it is here) . I am recently in an everything "blue" phase, so I went for this cobalt blue shade.
First thing to do is to decide on a pattern. Once you fix a design, everything else is simple and easy. I am using a shade of cobalt blue, and to get the marbled look, added a bit of white to create the swirls.
First thing to do is to paint the box in the shade of color you chose. Paint it regular way, but take care to have the brush strokes in one direction for the base coat. Once dry use a brush that has hard.strong tip or frills so that when you paint the brush strokes are visible and thick. Give a quick coat with the base paint color.
Now to create the swirls, the trick is to use a fan brush or one with wider but thin tip and do it before the second coat of paint is not dry. You have to barely dip half of the brush in white and other half in a lighter shade of the same blue color ( just add white paint and lighten it a bit) and give a wavy movement on the already painted surface.
I wanted to add some legs and a knob, so I painted the wood beads in Gold and glued on with the wood glue.
A box should be pretty inside and out right! Painting inside too doesn't take much effort but gives it a finished look.
Here are some more angles of the box.
What do you think of my marbled recipe Box? Yay or Nay? And tell me which one of the paint jobs is better ?
Do you like what you see? If yes, Please subscribe (on the side bar, it is free) and get regular updates or follow us on FACEBOOK or PINTEREST
Anima


Love this Anima!! The marbled looks really timeless and the touch of the golden legs and painting it on the inside truly makes the whole recipe box so precious! This would be an awesome gift idea!
ReplyDeleteP.S. I always love your photographs as well.
ReplyDeleteThank you Reshma. Your lovely comments make my day :-). I made it to gift a dear friend actually. Did not have a plan to blog, that is why, step by step photos are missing . Those who saw loved it, so thought to share here as well.
DeleteThis turned out really cute!!
ReplyDeleteThank you Steph. Thank you for stopping by.
DeleteVery pretty, great shade of blue! :)
ReplyDeleteThank you Jane, yes indeed it turned out a pretty shade. I don't know why, but I reach for blues for everything these days.
DeleteNothing wrong with that! There are a lot of different shades of blue that can really add a nice pop of color to a room! :)
Delete