DIY : A whimsical Vase


Sometime ago while on a browsing spree, I came across these vases from popsugar site. Aren't they cute and whimsy?


I had them in my head for sometime, even looked up where to buy them. But for simple vases, they are insanely costly, like upwards of $50 costly. Though I lost any hope of buying them, I was never allowed to forget since they popped up in the form of vases and planters many times since then - As they say, if you really want something, really really want something - whole universe would conspire to bring it to you - in my case, not to me in real, but in the form of pictures from around the web...


Anyways, when I saw this Styrofoam heads in Michaels, I knew I could get something closer to my ever eluding head vases from it. Not perfection- but close enough. For $3 ( with a coupon) , it is a win even without perfection.


The "action" part is simple though a bit messy and tedious. I just marked a circle on the head in the size of the plant pot I had - and cut it bit by bit until I could fit the pot fairly well. That's it.


I am not sure how well they will hold up if you try to put the plants directly in it - safer is to put a small potted plant or even use as a vase with small glass of water.

I can envision a number of occasions to put her into good use.


When I made her first, I dressed her up with a clay beaded necklace and a golden eye mask made of craft paper. When Halloween knocked , just replaced the mask for a black one and necklace for washi tape.


Hope she will see many many good days...


What are you up to this weekend? Hope you have a little time for some simple crafts among all the good food, movie and kids activities and clean up?

Anyhow, you have a beautiful weekend , see you again on Monday!

Keep Smiling,
Anima

Home Made by Carmona
WordPress inLinkz code:

Small Space Solutions : Small stools that multi-task


According to This Design Journal, small spaces are charming and welcome. But that doesn't mean they don't pose challenges, that spread across storage, furniture, space management, decor and the challenges turn into despair when it comes to entertaining and over night guests. On our weekend get-togethers, lack of seating has always been my secret gloom though I never expressed it aloud.

We have a three seater sofa and two side chairs. With a small corner with a side table and chair for Akshara and a TV console - the small room is not in any position to take  any more furniture. So stairs or the floor was the go-to place. I knew I needed some seating system that could be cornered when not in use but didn't know what or where to find it. Apparently small stools were not in my radar, never crossed my mind.


But one day on a casual recon I came across these cute and small stools in our local Goodwill, I instantly loved them - for they were small, in pair, stack-able yet sturdy and strong. A little bit of cleaning and a fresh coat of paint could turn them into my multi tasking accessories.


That is what I did. I had a can of dark purple spray paint, it wasn't choice - but that was what I had in hand. I kept the black seats, just covered up the tears with colorful tape. I kept them in the dining space, pushed against the wall. I did not have a re-upholstery plan for the seat cushion, but came across a floral print in perfect color for the stool at Joann. Bought a yard of it, but needed only a small part of it for this. I used the same technique to upholster as mentioned in this post.

Jo-Ann is currently running a 60% off clearance sale. Hurry if you have one near by.


They truly are hardworking, multi-tasking elements in the room. They are pulled out when we need extra seating. On movie nights, they turn out to be side table where we rest the drinks and snacks, they become a side table when I am working on something and need a bunch of stuff near by and they are also my trusted friends when I have to climb up to reach the top of kitchen shelves or put a nail on the walls - They can do almost any job - You just need to ask them nicely.


They can be seating and a side table ( this was before the re-upholstery job)


Do you like before & after shots ?- If yes, here is one,


Isn't it one cool, small space solution? Do you have any such "loved" piece of furniture that does it all? How do you solve the seating issues when you have more than ideal no of guests? Share your thoughts.. 

Keep Smiling,
Anima


Halloween : Easy Balloon Game


Happy Monday Friends,

As the 31st October and Halloween party and trick or treating is drawing closer, my mind is set on the games to play. Akshara has costume parade and lunch party at school. And we are playing some games and have fun rides planned to keep the kids entertained. Since she attends a pre- school, easy games - sack races, apple bobbing, scarecrow building etc are some of the games that fit the bill.


One another game that is fit for any party fun is the game of balloon popping. That is what I agreed to take up there. It isn't really a new game, rather it is ages old and classic - though an easily overlooked one.

Malayali Magazine, October 2014 Edition


I originally planned and executed this one for my magazine commitment ( Malayalimag.com ). The subject for October edition was, how to plan and prepare for a fun Halloween event. This game was part of the article. The fun part of this is, it can easily adapt to any occasions- birthday parties, X'mas fun, valentine's day event, it can change color and form to suit the event.


Supplies :

1) A pack of Balloons in your color theme.

2) Sticky tape to glue the Balloons.

3) colorful craft papers if you have any particular design in mind as here.

4) A pack of darts. I made them from the kitchen skewers but they are available in stores like walmart and amazon.


How-To:

Draw up a preferred shape on the backyard fence or wall. Fill it up with balloons in festive colors. Provide darts (skewers will go a long way) to aim and pop the balloons. I chose pumpkin shape and orange balloons for our party. This one is as easy as blowing up a balloon.
Game 2: Apple Bobbing


This one is a simple game but the laughter and cheer it brings is priceless.

Thus you get an easy, low cost yet fun game.

Hope you liked it.

What are the games you play at your parties? Share your easy, fun ideas.

Keep Smiling,
Anima

DIY : New lease on life for these chairs.

One thing guaranteed with the expat life like mine is that we are extremely cautious of bringing home big ticket furniture pieces. I am talking about the likes of sofa, credenzas, dining set, Bedroom furniture etc. So when my thrift store dining chairs started getting dingier day by day I had to think long and hard as to what to do about them.


We didn't want to invest in new chairs and I didn't want to sell them in their poor state. We already had replaced the dining table from the set with an Ikea piece that matched the chairs. Now to find the chairs that matched the table! I didn't come across anything that fit our budget in craigslist either. Only thing left to do was to recover them.


A thing like re-upholstering could be really intimidating for someone just starting out on doing these things on their own. At the least it was so for me. For that just one reason, my new stapler sat inside the box for a while. I still was so unsure, I didn't even buy a fabric. But one fine afternoon, I simply decided that I am going to do it. Lucky for me, I had this curtain panel that I bought just because it was on clearance in Target. It turned out to be too dark for our small room, and sat in the closet waiting for another move. ( Lesson - do not buy things just because they are cheap)


From the time, this was actually done


So I decided to use it. If it doesn't work out - only this one panel is lost - which is a loss anyways. So I removed the chair seats from their base and set out.

The fabric that was originally on them was stapled on too. There were about fifty staples on each. And removing those from the cushions - no that was neither easy, nor pleasant. Before long I realized this wasn't going to be a short job.

Lesson Learned : You need patience - boat loads of them

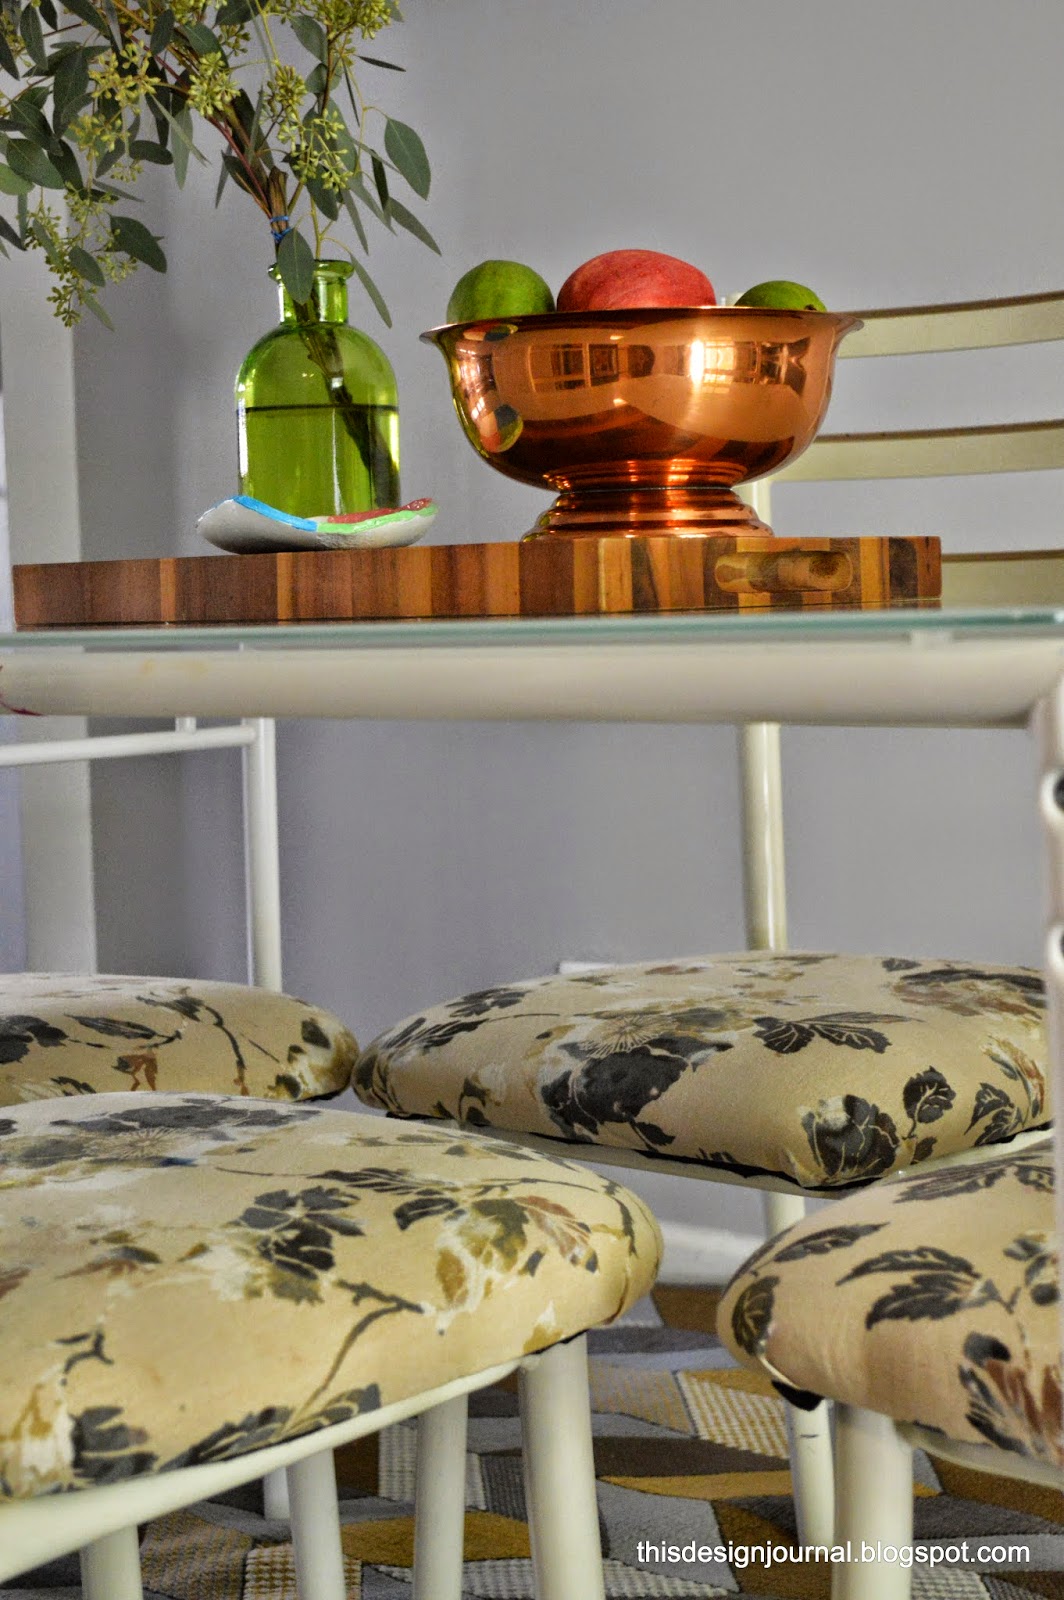
But I pressed on and after spending about 4-5 hours, I had new looking chairs. I wouldn't say best of chairs - but definitely a bit chic and pleasant.


I was excited - so excited that I immediately posted a picture story on facebook to share with friends. Some of my friends liked it and some of them had nice words for me. Honestly, those encouraging words seeded this blog. Oh, what a set of chairs can accomplish !

I don't have step by step pictures of the procedure taken. In my defense, this was done long before the blog and more over I had zero confidence in what I was doing then. But I will try to explain as best as I can.

How-To :

Easiest way is to watch this TUTORIAL. I am still explaining because, what if they decide to remove it from the web later and I forget the details? (kidding - But video is definitely easier)

1) Remove the chair pad, the seat that you need to re-do. They would be screwed-in, in most cases.


2 ) Now remove the outer cover. Most of the cases the fabric would be stapled on. I am not sure if they glue them on professionally done chairs. If it is staples like me - be ready for two really tired hands at the end. If you are re-doing this only because you are tired of the same cover, then you can probably skip this - that is based on the thickness of the existing as well as the new fabric too. If they are very thick as in leather, then you may have to remove the cover anyways.

3) Once the outer fabric is removed, check the condition of the batting or the cushion part. If it is bad then you can replace this too. Most of the fabric stored will carry the batting. If not, home improvement stores will have them. I didn't need them because the batting was quite good underneath.

4) If you are replacing the batting, then cut out the batting at least half inch longer than size of chair pad on each side. This will ensure snug fit. Attach it to the pad with fabric glue.

5) Once the glue is thoroughly dry ( at least 1 or 2 hours), you are ready to attach the new fabric to the seats. Cut out the fabric two inches longer on every side. Put the fabric face down and place the pad on top. Now stretch the fabric tightly with one hand and put the staples on with the stapler.


Most effective way to stretch & staple

6) Finish the sides first leaving the corners to the end. There are a number of ways to do the corners. You can fold over neatly as the corner guides you and put a staple on it. Since my stapler wasn't that strong, I folded the corner edge and stapled it first. Then folded the left over part almost perpendicular to the sides. But don't worry - follow what is convenient to you. You can even cut the fabric on the sides and then fold over.

7) Once done, it is better to cut the extra seam to have a cleaner look.


Once stapled and fabric trimmed, it will look like this.

8) Re-attach the seat pad back to the chair base and Ta-da...enjoy your new-looking chair.


P.S : That was a time I neither thought of doing any serious DIY nor I had any tools other than the basic screw driver and hammer. So I checked out a few YouTube tutorials and scoured Lowes and Home Depot to find an appropriate Stapler. Not that I did find one, I was an idiot who went for the cheapest of the upholstery stapler in town - even at $12 that did feel to be splurge. If you are newly buying - Buy a heavy duty, powerful Stapler. It is handy in many upholstery jobs - even fixing up damages. For reference I bought this one. ( I don't recommend this)

Wish you happy weekend friends - Ours is filled with sweets, cakes and feast - Yay to sweet little get-togethers.

See you soon.
Anima
 

Seasonal Crafts - An easy way to make memories


We at the design Journal home are not really big on Halloween. Only person who is enthusiastic about it is Akshara- that is because she loves the idea of wearing her costume and go trick or treating and collect some candies.

But we sure are big on crafts, especially ones that can keep us entertained in our afternoon hours. More so because weather outside is getting chillier and windier and playing outside is not a good option.


Our Halloween decorating is the sum up of little crafts we ( Me and my little girl) did together on many such afternoons. Since these were really meant to be fun for a 4 year old, they are really simple so simple that they involve only some paper,paint,crayons and stickers. And if you are looking for scary and spooky - again we are not fans. Yay for cute and Nay for scary.


First up is the one that we enjoyed most. This pumpkin is decorated with crayons in rainbow colors ( I checked, rather coerced in a thousand and one ways to get this in Halloween colors, but she was hell bent on rainbow ones, that too of her choice) melted on the pumpkin. 


All we did was to stick the crayons around pumpkin and then using a hair dryer blew hot air on them to melt them. They would have been much more perfect if was done faster with a steadier hand. This is also the first time I loved the mess it made along with the art itself.


We painted some pumpkins and gourds too and put stickers and tapes on them to our hearts' content. More than that little shelf could handle. It helped that our neighborhood patch was selling them for cheap.


The white planter that is head of a woman doesn't have much to do with Halloween, but I put a black paper eye mask to make it spooky? 


To add a black touch which seems to be a must have color of the festival along with white - I painted a spare frame with black border. And made a banner with paper cutouts with letters painted on them. 


The hanging fixture is Christmas ornaments filled with colorful paper cut outs and beads. I am not sure why but tracing and cutting seem to be an "in" thing with little ones. Akshara sits with this one activity for hours. Painting those beads were added bonus.


Above and beyond we love this season so far. The pumpkin patches, walking around collecting colorful leaves, collecting acorns for some X'Mas crafts, fall festivals - it has been fun so far. 


We are waiting for some Halloween party fun and trick or treating with friends now - How about you? Do you use crafts as a way to having some quality time with kids too? A way to make some beautiful memories of the beautiful seasons?

Keep Smiling & Have fun,
Anima